Tips for Teaching Online

By Lisa Anne Floyd and Steven Floyd

pic

Here are 12 logistical tips to improve clarity and communication, and to support teaching and learning online.

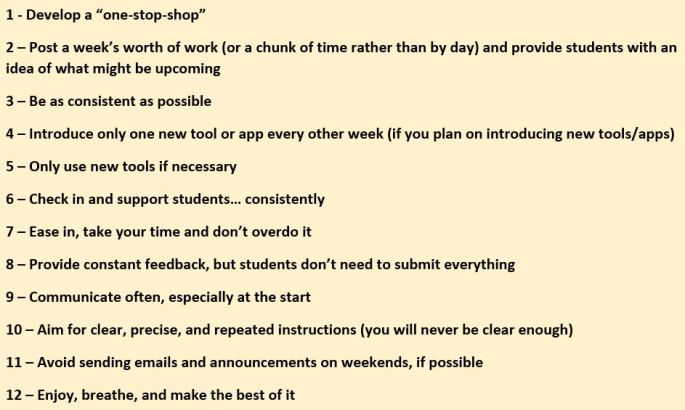
1 – Develop a “one-stop-shop”

Post all tasks in one place and link to activities from one location. For example, Learning Management Systems (LMS) tend to have an announcements and/or activity feed area, so you can post all tasks here. You can link to different internal content and tools in the LMS, or you can link to external resources and tools that are available on the world wide web. The key is to have all the links and instructions in one place. This avoids confusion and reduces worry about having missed an instruction or activity.

This is especially helpful when students have multiple instructors for courses, as every instructor tends to do things differently. Students will get in the habit of visiting one area immediately upon logging on, rather than clicking around trying to locate expectations and tasks.

2 – Post a week’s worth of work (or a chunk of time rather than by day) and provide students with an idea of what might be upcoming

Asynchronous online learning allows students to complete their work when they have access to the computer or when their schedules allow. Students might only have access to a computer two evenings a week, one hour every morning or one full day, depending on their home environment. You can still indicate which days and/or the order in which you recommend students complete tasks; but think of the time chunks in weeks rather than days. This requires a different mindset, and results in a lot of front-load work each week by the teacher; but results in less pressure for students and eventually becomes less onerous for teachers who no longer need to post each day.

Students appreciate knowing what you might have in store for them in the future. Giving them a glimpse of what might be upcoming, helps them to see their learning as a long-term process, rather than distinct events that are over at the end of each week.

3 – Be as consistent as possible

Keep your weekly routines consistent – perhaps you will begin with a quote or a video on which students can comment in the discussion forum (remember to link to the forum from the announcements area -*see tip Number 1). This can vary depending on your personal approach, which you might still be figuring out, but try to be as consistent as possible. Post in the same areas, use the same tools and do your main post at the same time each week if possible.

4 – Introduce only one new tool or app every other week (if you plan on introducing new tools/apps)

While there are many wonderful tools and applications available, it can be daunting for students to learn a new one each day or even week, unless you’ve introduced these in your onsite classes. Instead, plan to introduce only one new tool or app every other week and select tools/apps that you know you will use throughout the course, as this will ensure students become familiar with the login process and how they work. You will find you will receive less emails and messages that require troubleshooting as well, allowing you to focus on more meaningful tasks.

5 – Only use new tools if necessary

Carefully consider the use of new apps/tools. Adding additional tools within the LMS and/or apps can be overwhelming for students, especially when they might have other teachers using additional tools/apps as well. Decide if the new tool/app truly enhances the experience, and if it does, is the effort by students having to register, the troubleshooting the instructor will need to engage in really worth it? It may be that this is the case, but ask yourself this question each time you are considering including another tool/app.

6 – Check in and support students… consistently

Consider connecting with three to five students each week (or other chunk of time depending on the number of students/classes you are teaching). This is useful, especially when you know how long tasks tend to take in class but might not be so sure when students are working online or at home without teacher support. What you think may take students one hour, may take much longer. In most cases, teachers tend to underestimate the time it takes to complete tasks at home.

Ask students if there is anything you can help them with or how their week is going. Share with them some encouraging words or inspiring quote. Tell them you appreciate what they wrote on their post on Tuesday. Let them know you are there for them and how they can contact you.

7 – Ease in, take your time and don’t overdo it

It will get easier. The front-load work for teaching online can be overwhelming for both teachers and their students. It is especially challenging when classes suddenly switch to online given a pandemic!

Consider how many teachers begin their traditional, face-to-face class,- they often start the semester with an emphasis on classroom routines and habits, then once these are established, they increase the complexity of the tasks or begin focusing more on course content. The online or remote learning classroom can be started in much the same way, with simple tasks that allow the students to get used to the routines and tools that will be used throughout the course.

Remember – quality over quantity!

If you are unsure whether to post “one more task”, perhaps consider providing “Additional suggested, but not required” tasks each week. If students feel they need additional practice or their parents are looking for more support, then they can always check out your “Additional” materials.

8 – Provide constant feedback, but students don’t need to submit everything

You can provide ongoing feedback if students request it or have questions that you can respond to in the LMS. Submitting one or two assignments each week for which to provide feedback is acceptable. Be strategic in what you select to assess. You can also provide overall feedback to students rather than individual feedback – i.e., Common errors in math solutions and how to debug them or overall recommendations for improving their written work.

Rather than spending so much time marking, focus your time on sending emails or messages within the LMS to check in with your students. You might create a survey as a form for students and/or parents. Questions you might ask are: what would you like to see less of, more of or what do you enjoy the most? Perhaps you will ask the number of hours the tasks are taking each week. Give students (and possibly parents) an opportunity to share any concerns. This will result in one spreadsheet to review, rather than multiple emails to which you will need to reply. Posting a survey every few weeks is useful to not only find ways to improve the online learning experience, but to also find out what students like about what you have been doing! You might be surprised what they tend to enjoy the most.

9 – Communicate often, especially at the start

When students (or their parents) write an email to clarify, try to reply as soon as possible, even if you don’t know the answer. For example, if someone is unable to login to the LMS, if you happen to be online at that moment, reply right away indicating that you have received the email and are looking into it. This gives people peace of mind that they know someone is working on the issue.

The emails and questions will slow down!

When students are expected to submit something, check in with them immediately after the due date if they haven’t yet. Consider using phrases such as “I just thought I’d check in to make sure everything is okay as I noticed you haven’t submitted your math assignment yet. Is there anything I can help you with?”

10 – Aim for clear, precise, and repeated instructions (you will never be clear enough)

No matter how clear you think your instructions are, you will likely never be clear enough, especially during the first few weeks of an online course. It takes a while for students to get used to navigating what may be a new environment. Most instructors tend to do things differently than others. After posting, even though most LMSs have a “student view” for you to check over, send a message to a random student each week or one who you know is online often and ask them to check it over for you. Do all of the links work? Is there anything that is not clear? Many students love providing feedback to their instructor.

You will find that students (and maybe their parents) will write emails asking for clarification on things that you’ve clearly posted. This happens no matter how clear you feel you’ve written instructions. These emails and messages will reduce in quantity once students become more familiar and comfortable with your routines. Be patient and try to keep in mind they are reacting quickly and may not be paying as much attention to details because they are overwhelmed. Use bold font and italics. Avoid underlining text unless it is a link (as this is confusing for students – underlined text indicates they should click). AVOID UPPERCASE LETTERS, -they tend to be read as yelling. You might respond, something like “In the announcements, you should see that….” and answer their question. Don’t send them on a scavenger hunt (unless that’s the point of an assignment). Use bullet points and chunk information. White space helps to reduce the overwhelming feeling that a lot of text can ensue.

If possible, set up an area, perhaps in the Discussion Forum, for students to post questions about their tasks or what needs to be done. Encourage students to post their question in this area and include the link in your main weekly announcement if you know how to do this. Chances are, another student will answer it for them and save you time! Also, many students tend to ask the same question – so you can direct them to this area if you’ve already responded to a question. Encourage your students to always check this area before sending you an email or message within the LMS. Eventually, students will become more independent.

11 – Avoid sending emails and announcements on weekends, if possible

Try to respect your students’ personal time as well as your own. Keep announcements to a minimum and try to stick to posting during the school week. Of course, there are times, when you might only have a moment on weekends or odd hours to post, or when a student is looking for a response about an assignment, but when possible stick with Monday morning to Friday afternoon.

If you feel better preparing your work on a Saturday for the following week, many LMSs will allow you to post announcements and release activities at scheduled times. Ideally, you can schedule the main weekly announcement around the same time each week. This provides some consistency for students and they begin to discover the rhythm and flow of your course.

12 – Enjoy, breathe, and make the best of it

Teaching online can be a rewarding experience. If you are new at it or have been thrown into it due to a pandemic, it might seem overwhelming and stressful, but don’t worry – you will get more comfortable and begin to come up with ways and methods that work for you, just as you have in an onsite classroom. If you are flexible with students, you will find your own time can be more flexible as well. You will find you will get to know your students in different ways than in an onsite environment. Some students share more online than in class, and some might be quieter online. You will begin to establish a rapport with students online and this continues to be just as important as it is in onsite classroom environments.

Good luck! Let us know if you have additional tips to share and/or which tips are the most helpful to your teaching practice.

list

Text to Speech and Translation Blocks in Scratch 3.0

Making Your Applications More Accessible

One of my favourite coding environments to learn to code with is Scratch. Recently, Scratch released their 3.0 version with many new additions and capabilities. I have shared some ideas to make use of the new Text to Speech and Translate extensions. The programs below get progressively more challenging.

You might have students follow along. Afterward, be sure to challenge students with extension/challenge activities. I’ve included some challenges for you to consider trying out.

beartranslate


Adjusting your Scratch applications to make them more accessible…

Part 1 – Text to Speech blocks

I will share with you some simple code that you can include in your applications to make them more accessible. I will show you how to make the character say something in a speech bubble as well as with their voice so the user can hear the same text.

Video tutorial: https://youtu.be/vtOuK7PcQLo

Here is what the code looks like…

image1


Translating text in Scratch…

Part 2 – Translate blocks

I will show you how to add code that will translate text from one language to another.

Video tutorial: https://youtu.be/3wUhdTllgKk

Here is what the code looks like…

image2

Part 3 – Including a variable

I will show you how to replace the text that is repeated throughout the program with a variable.

Video tutorial: https://youtu.be/DWcn6ZT4MYU

Here is what the code looks like…

image3

Part 4 – Getting input from the user to translate

I will show you how to ask the user for words or a phrase that will be translated to another language.

Video tutorial: https://youtu.be/m2teQygHNoA

Here is what the code looks like:

image4


Using lists to obtain and translate words entered by the user

Part 5 – Challenge: Translating Lists

For this more advanced application, I’ve used a counter, a loop and lists to create a program that asks the user for a number of words and then translates each word one, by one.

You can see that lists are used rather than variables to store each word.  I’ve also made use of creating my own blocks, which are like functions. Can you figure out how the code works in this application?

Video Demonstration:  https://youtu.be/Z4KlzJT-lq0

Application Link: https://scratch.mit.edu/projects/280044496/editor/


Other Challenges:

1 – Allow the user to select which language they would like to translate the words to.

2 – Can you figure out a way to remove the word “stop” from the list of words other than deleting the last word in the list as I’ve done?

image5

For help with counters, check out the applications on this link.

Let me know if you have more ideas!

Counters in Scratch 3.0

Counter example applications

Simple Score – In this application, I’ve used simple code that can keep track of scores in a game.

teamscores

Video Tutorial: https://youtu.be/VDiGJr2K4Hc

Application Link:  https://scratch.mit.edu/projects/283077497/editor/

Perimeter – Check out this application that uses a counter to keep track of the number of steps the mouse moves. As you press the arrow keys, the counter, or perimeter, in this case, is increased by 1. Feel free to remix this and add your own creative elements to the program!

perimeterperimetercode

Application Link: https://scratch.mit.edu/projects/283077691/editor

Video Demonstration: https://youtu.be/h-9NkrvekMY

Carrying on the Momentum Surrounding Coding (Code On!)

What a week for Ontario educators! I was excited to hear the recent announcement by Minister Mitzie Hunter about the support for Computational Thinking in the classroom and the momentum that’s building around coding across the curriculum in Ontario.

I’m sure that many educators are now feeling more empowered and eager than ever to code in their classrooms.  While participating in the Hour of Code, teachers likely witnessed students fully engaged in learning the basics of coding while being challenged to think through well-written online tutorials and apps.  What they observed was students using coding as a context for developing their Computational Thinking skills.

Many wonderful articles have been written about what Computational Thinking is and research has shown it to be a “powerful cognitive skill that can have a positive impact on other areas of children’s intellectual growth” (Horn, Crouser, & Bers, 2013).  If we really value Computational Thinking as individual educators and as a province, however, we need to capitalize on this momentum in order to provide our students with greater access and opportunities.  Now that the Hour of Code has given you a glimpse of coding’s potential, it’s time to explore and learn along side students while continuing your journey…

I see the Ministry of Education announcement as an opportunityconnectedcode to empower teachers, principals, coordinators, superintendents and directors to search for the best ways to support students. Educators can now look for ways to further implement Computational Thinking into their classrooms and across disciplines, which will help students to make important connections and apply their understanding in meaningful ways.  It will also enhance the potential for students to collaboratively create, empathize with end users’ needs and wants, and share their programs with others before iterating. The design process will be alive and well in Ontario schools! In Connected Code: Why Children Need to learn Programming, Kafai and Burke (2014) describe this other important aspect as “Computational Participation”, where students not only think, but create, share and connect with others.

So what’s next?

As educators build on their Hour of Code initiatives, there are many ways to proceed and many considerations for next steps related to the integration of coding and Computational Thinking in our classrooms.

I would encourage educators to look for opportunities to attend well-designed workshops on coding, particularly ones where integration into and spiraling of current curriculum is emphasized, creativity is valued and participants are challenged with hands-on activities to the point where it is “…hard fun” (Papert, 1980).  The quality of such workshops can vary,-generally you should seek out presenters who have experience as educators, and who have been coding with students in their own classrooms.

I would also encourage educators to explore sandbox-type applications for codyesing, which allow for greater creativity on the part of our students. Tutorials are a great starting point, but it isn’t until students are creating their own algorithms and programs that they are truly engaged in authentic learning.  Remixing programs created by others and encouraging students to value the debugging process as a learning opportunity will no doubt support students across all subject areas.  Students are naturally motivated to fix their errors, support each other with finding the source of mistakes and it becomes a celebratory experience when they succeed.

debugging
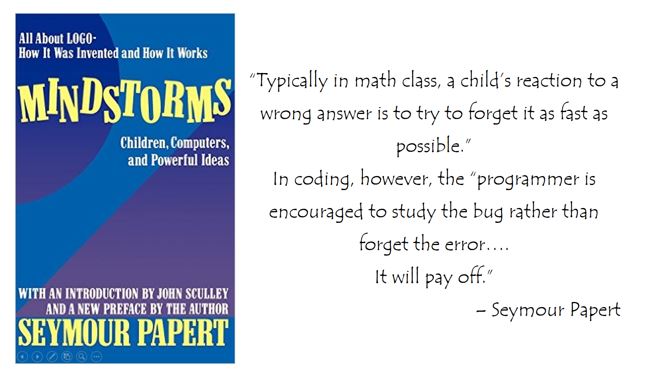
Teachers and parents often inquire about what the best tools are for learning to code…
I want to emphasize the fact that it’s not necessarily about the tool,-it’s how you use it for learning that matters most.  I do, however, see some tools as being more effective than others for learning how to code.  I’ve included a list here:

Scratch JR

Scratch

Micro:bit (huge potential and being distributed in Canada soon!)

Raspberry pi

Arduino

Sphero

Lego Mindstorms

You can create anything you want through coding,-you can code art, music, choose your own adventure stories and even program your computer to do your math homework for you!  Teachers who have empowered students with coding activities begin to see something special take place almost immediately.  There is a higher level of thinking that naturally occurs, students begin to appreciate the value of iteration and there seems to be a continuum of challenging opportunities for all levels of readiness and interest, resulting in true engagement.  With persistence, an emphasis on pedagogy and providing opportunities for students to program solutions to real-world problems, teachers will see a positive shift in their classroom culture.

dyson

If you are feeling reluctant and apprehensive about coding in the classroom, just know that you are not alone!  I encourage you to take the plunge, code with your students and don’t be afraid to reach out to others (including your own students) for assistance.  After all, Dr. George Gadanidis of Western University’s Faculty of Education says it best: “…teaching is not about you or me, it’s about children and their wonderful minds” (Why Math + Code, 2015).  Empower yourself and your students through the development and use of Computational Thinking skills within the context of coding.  Just go for it!


 References

Goodman, N. (2012). James Dyson on Using Failure to Drive Success. Retrieved December 11, 2016, from https://www.entrepreneur.com/article/224855

Horn, M. S., Crouser, J. R., & Bers, M. U. (2013). Tangible interaction and learning: the case for a hybrid approach. Personal and Ubiquitous Computing, 16(4), 379–389.

Kafai, Y. B., & Burke, Q. (2014). Connected code: Why children need to learn programming. Cambridge, MA: The MIT Press.

Papert, Seymour. (1980) Mindstorms: Children, computers, and powerful ideas. New York: Basic Books.

Why Math + Code? (2015). Retrieved December 11, 2016, from http://researchideas.ca/mc/article-1-title-recent-issue/interview-september/

Computational Thinking Unplugged – Identifying 2D Shapes from their Code

I recently tweeted about an activity we did in the Computational Thinking in Math Education (Primary/Junior) Course that I teach at Western University’s Faculty of Education:

unplugged

Many educators appreciated this idea, as not only is it an unplugged opportunity, meaning students don’t require a device, but because you really have to think to determine the shape that has been coded.

Joel Speranza tweeted about the fact that supplementary angles are brought up when analyzing coded shapes.  Many of the pre-service teachers in the Computational Thinking class noticed this as well.  Jen Apgar suggested having students run the code in the snow, and record the time lapse!  What a cool idea!  Blayne Primeau (a fellow Port Elginite!) admitted his “geeky” side in that he loves this as a minds-on task and suggested having students figure out how they could adjust the code to create similar shapes. I love when a tweet results in my PLN coming up with ideas for remixing a task that I’ve shared!

“In order to learn something, first make sense of it” – Seymour Papert, Mindstorms

As computational thinkers, our students use decomposition,- that is, they break a larger problem down into smaller, more manageable steps.  Students need to deconstruct the code in their minds.  They also need to have an understanding of algorithms, sequencing and pattern recognition.  Many lines of code are executed in sequence, while some lines of code are repeated several times.  This “circle of squares” shape is a prime example:

circleofsquarescircleofsquarespic

Being able to visualize what is being drawn on the screen is also key in order to correctly identify the coded shapes.  In Fostering Spatial Understanding in Geometry, Kinach (2012) points out that in order for students to understand math ideas, they must be able to make sense of the world and to be able to visualize relationships in data.  Students often find themselves moving and rotating their bodies as they read each line of code.  I discuss this idea of “Body Geometry” in my first Blog post.  Papert (1980) describes this type of geometry as being syntonic,-that is, it’s related to “children’s sense and knowledge about their own bodies”.

Of course, the real magic happens when students actually create something through code.  While this activity is a great way to get students thinking and exposed to coding without a computer, having students actually coding their own shapes is always more engaging and allows for their creative side to be harnessed.

Perhaps, students can code a shape in Scratch and then write it on a piece of chart paper. The students and teacher can be confident that their code works, because they will test it out in Scratch first, debugging along the way.  The chart paper can be displayed around the room and students can do a “gallery walk”, identifying shapes and interacting with one another to discuss what they see. After all, humans are social beings and Jaworski (2015) suggests that we learn through “engagement with others: people and tools help us achieve what we cannot achieve alone”.

You can see an example of this below.  Enzo Ciardelli has his students do a similar activity after coding in Hopscotch (a block based app available on ipads).

enzo

Let’s have a look at some possible shapes that students might code for one another to identify. I’ve included what will be displayed for your convenience:)  Why not try it out with your own students?  Let me know how it goes!  What kind of math talk did you observe through this activity?

squaresquarepic

equilateral-triangletrianglepic

circlecirclepic

parallelogramparallelogrampic

circleofsquarescircleofsquarespic

househousepic


References

Jaworski, B. (2015). Teaching for mathematical thinking: inquiry in mathematics learning and teaching. Mathematics Teaching, (248), 28-37.

Kinach, B. M. (2012).  Fostering Spatial Understanding in Geometry.  Mathematics Teacher, 105(7), 534-540.

Papert, Seymour. (1980) Mindstorms: Children, computers, and powerful ideas. New York: Basic Books.

Using Body Geometry and Variables to Code Designs in Scratch

Making use of syntonicity and the power of variables to enhance a geometry program in Scratch

Variables play an important role in computer programming (often referred to as “coding”) and allow your programs to be flexible.  Once you can make sense of using variables, you will be able to create powerful programs!

Variables are like containers,-they hold information, and as the name suggests, this information may change throughout the program.  In a football game, for example, each team will have their own variable for the score, which is then displayed on the scoreboard.  In a video game, variables are used to keep track of players’ points.

We will use variables for two purposes in this program: to change a distance moved and to keep track of the number of steps the sprite moves (a counter).

The shape we are going to create is inspired by Seymour Papert in his book “Mindstorms”:

squarespiral

We’ll call this a “Square Spiral”.

In order to create this shape, students will need to make use of geometry skills.  They will need to decide on the initial length of the side of the square and will also develop an understanding of the degrees of rotation required for the Sprite to make a square shape.

Ideally, students have already had an opportunity to create two-dimensional shapes in Scratch in a previous lesson.  See the videos below:

Coding a Square

Coding a Triangle

Coding a Circle

Coding Many Circles

As students work out how to make their Sprite move to create geometric shapes, they are using what Seymour Papert refers to as “Body Geometry”.  He believed this type of geometry is learnable because it is syntonic,-children are relying on their sense and knowledge of their own bodies.

If you consider, for instance, how to walk in the shape of a circle, children will get up, and begin to walk in a circle, and soon realize that they move a little, turn a little, over and over again.

For the “Square Spiral”, let’s consider how to create it using Body Geometry:

     Move a little, turn 90 degrees.

     Move a little more, turn 90 degrees.

     Move a little more, turn 90 degrees….

In Papert’s Logo language, it would look something like this:

     Forward 5

     Right 90

     Forward 10

     Right 90

     Forward 15

     Right 90

     Forward 20

     Right 90

     ….

Can you see the pattern?

Let’s take a look at how this could be coded in Scratch:

inefficient

The move block steps are increased by 5 each time.

The turn block remains at 90 degrees.

This would take a long time to code in Scratch, having to update the move block each time you need it.  This code works, but is inefficient.

Variables

Let’s now introduce the power of variables!

Traditional use of variables in math, such as: 3 + x = 10  aren’t always “personally relevant”, as Papert suggests.

In coding, the idea of a variable becomes a source of power!  Not only do students see their usefulness, but they also appreciate that we tend to use descriptive names rather than single letters in coding.  In this case, students are making use of a variable to create an aesthetically pleasing design.

Let’s have a look at the same program, but with the use of a variable, called moveAmount:

codewvariable

Steps to Using  a Variable:

1 – When writing computer programs, we first say that we are going to create a variable.  This is called “declaring” a variable.  In Scratch, you select Data, Make a Variable and give it a name.  Our variable is called moveAmount, in this case.

2 – The variable is then given a starting value.  This is called “initializing” the variable.  The set block was used in this program to give the moveAmount a starting value of 5, because we want the sprite to move five steps in their first move.

3 – Finally, we can use the variable.  We use the variable in the move block, as well as in the change block.  The moveAmount variable increases each time the sprite moves.

We’ve also introduced a repeat block (which students will have used when making two-dimensional shapes in a previous lesson).

To a programmer, this code is much more aesthetically pleasing.  It is efficient.

“Perfection is achieved not when there is nothing more to add, but when there is nothing left to take away”. – Antoine De Saint-Exupery

(Thanks, Steve Floyd for the quote suggestion)

     The first time the Sprite moves, it will move 5 steps, since we have indicated that the  moveAmount value is set to 5 at the start of the program.

     The Sprite will turn 90 degrees and then the moveAmount variable is increased by 5.

     The second time, the moveAmount is equal to 10 (since we increased the initial value by 5).

     The Sprite will move 90 degrees, the moveAmount variable is increased by 5 and so on….

Here’s a video explaining how to use the power of variables to enhance the program as shown above.

Extensions…

How could students adjust this program to make the spiral tighter or wider?

How could students adjust this program so that the base shape is a pentagon, rather than a square?

An Accumulator

Just for fun, let’s throw in another variable to keep track of the total number of steps the Sprite moves.

accumulatorprogram

The variable “total” will start out at 0 and increase by the moveAmount each time, so it will keep track of the total number of steps displayed.

For a full description of how to add an accumulator to this program, watch the video below:

Students might now go back and adjust their basic two-dimensional shapes to determine the perimeter using an accumulator variable.

Accumulator and Counter variables are often used in games to keep track of scores and time passed.  In a trivia game, for example, each time the user gets a question correct, their score accumulates by a certain value.  You might also count the number of times a user attempts a question.

In Ontario, geometry can be found across the grades, (thanks to Katrina Massey for sorting through the curriculum docs). You can see that integrating this type of “body geometry” through coding readily touches upon curriculum expectations at each grade level (of course, you will need to adjust the skill level depending on students’ readiness and prior experience):

expectations.JPGAdditional Extensions…

After students successfully code the square spiral, encourage them to explore with other values, other base shapes (e.g., triangle, pentagon, octagon) and perhaps even try out the shape below (a coil, also inspired by Papert):

coil.png

Here is a hint to the code (Note: * is the multiply symbol in coding world):

     Forward 20

     Right 5

     Forward 20 * 0.99

     Right 5

     Forward 20 * 0.99 * 0.99

     Right 5

     Forward 20 * 0.99 * 0.99 * 0.99

     …


Blog Intentions

This blog is meant to provide educators with ideas and tasks to use coding with their students.

Many suggested tasks will be created with the intention to integrate coding into math class. I also plan to share challenges for teachers to try with their students.

If you have any suggestions for future posts and coding ideas, send me an email or a tweet!

lisafloyd834@gmail.com

Follow me on Twitter at @lisaannefloyd

Thank you to Brian Aspinall for encouraging me to begin “blogging” and for being a source of inspiration with his own blog.

I hope you enjoy my first official post.  Thanks for visiting!

Lisa